
Aave Pro (live at pro.aave.com) is the dedicated interface for Aave V4, which is Aave's most significant protocol upgrade to date. This new UI is designed for DeFi power users, and will continue to introduce new tools and features that make interacting with Aave as easy as possible.
While the core lend and borrow actions will feel familiar for users, V4 introduces a fundamentally new underlying architecture that changes how markets are organized, how liquidity is orchestrated, and how risk is controlled. In short, lenders have more options for deploying assets and borrowers access more tailored parameters based on their intended use cases and individual risk profile.
This guide walks you through what's different, what to expect, and how to navigate the new Aave Pro interface.
How Aave V4 Works
Aave V4 organizes its protocol around two components called Liquidity Hubs and Spokes. A Liquidity Hub is a smart contract that holds the protocol's liquidity. When you deposit USDC, your USDC ends up in a Hub. When someone borrows USDC, the Hub releases those funds to the borrower.
A Spoke is a smart contract that connects to a Hub and enforces a specific set of borrowing rules. Each Spoke defines which assets count as collateral, what the borrowing limits are, and how interest rates are determined, etc. A single Hub can have multiple Spokes connected to it, and each Spoke can have its own risk profile.
This separation is important because the protocol can offer markets with very different rules, such as one market for blue-chip assets with conservative collateral requirements and another for higher-yield strategies with different risk tolerances.
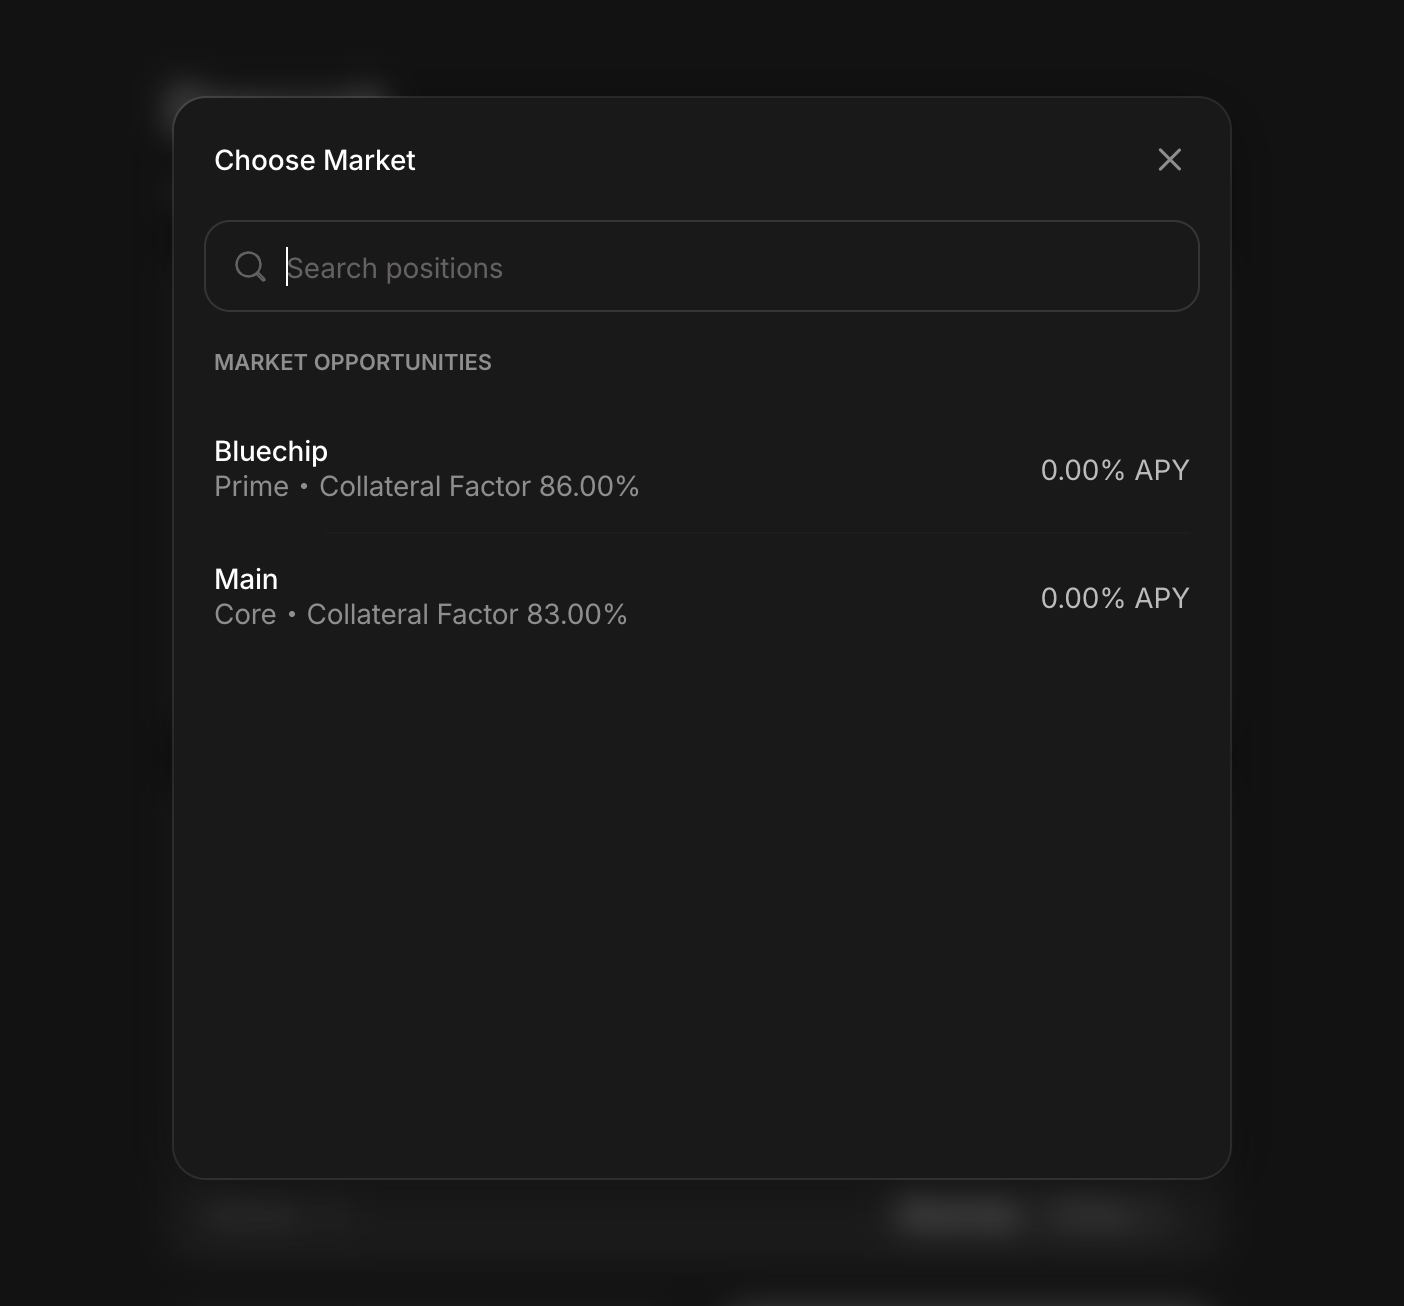
Understanding Markets
Many assets on Aave Pro are available across multiple markets. A market on the UI is identified by a Spoke name and a Hub name. For example, "Main Core" refers to the Main Spoke connected to the Core Hub. "Bluechip Prime" refers to the Bluechip Spoke connected to the Prime Hub.
The Hub name tells you which liquidity pool the market draws from and the Spoke name tells you the specific risk rules and collateral options that apply.
For example, the Main Spoke accepts a wide range of assets like WETH, USDC, AAVE, and WBTC as collateral. Meanwhile, there are specialized Spokes that handle specific asset categories. For instance, the Ethena Ecosystem Spoke that allows for stablecoin yield strategies.
Different markets for the same asset will often show different interest rates and different collateral factors. A market with stricter collateral requirements may offer a lower borrow rate and a market with broader collateral options may carry a slightly higher rate to account for the additional risk.
Navigating the Interface
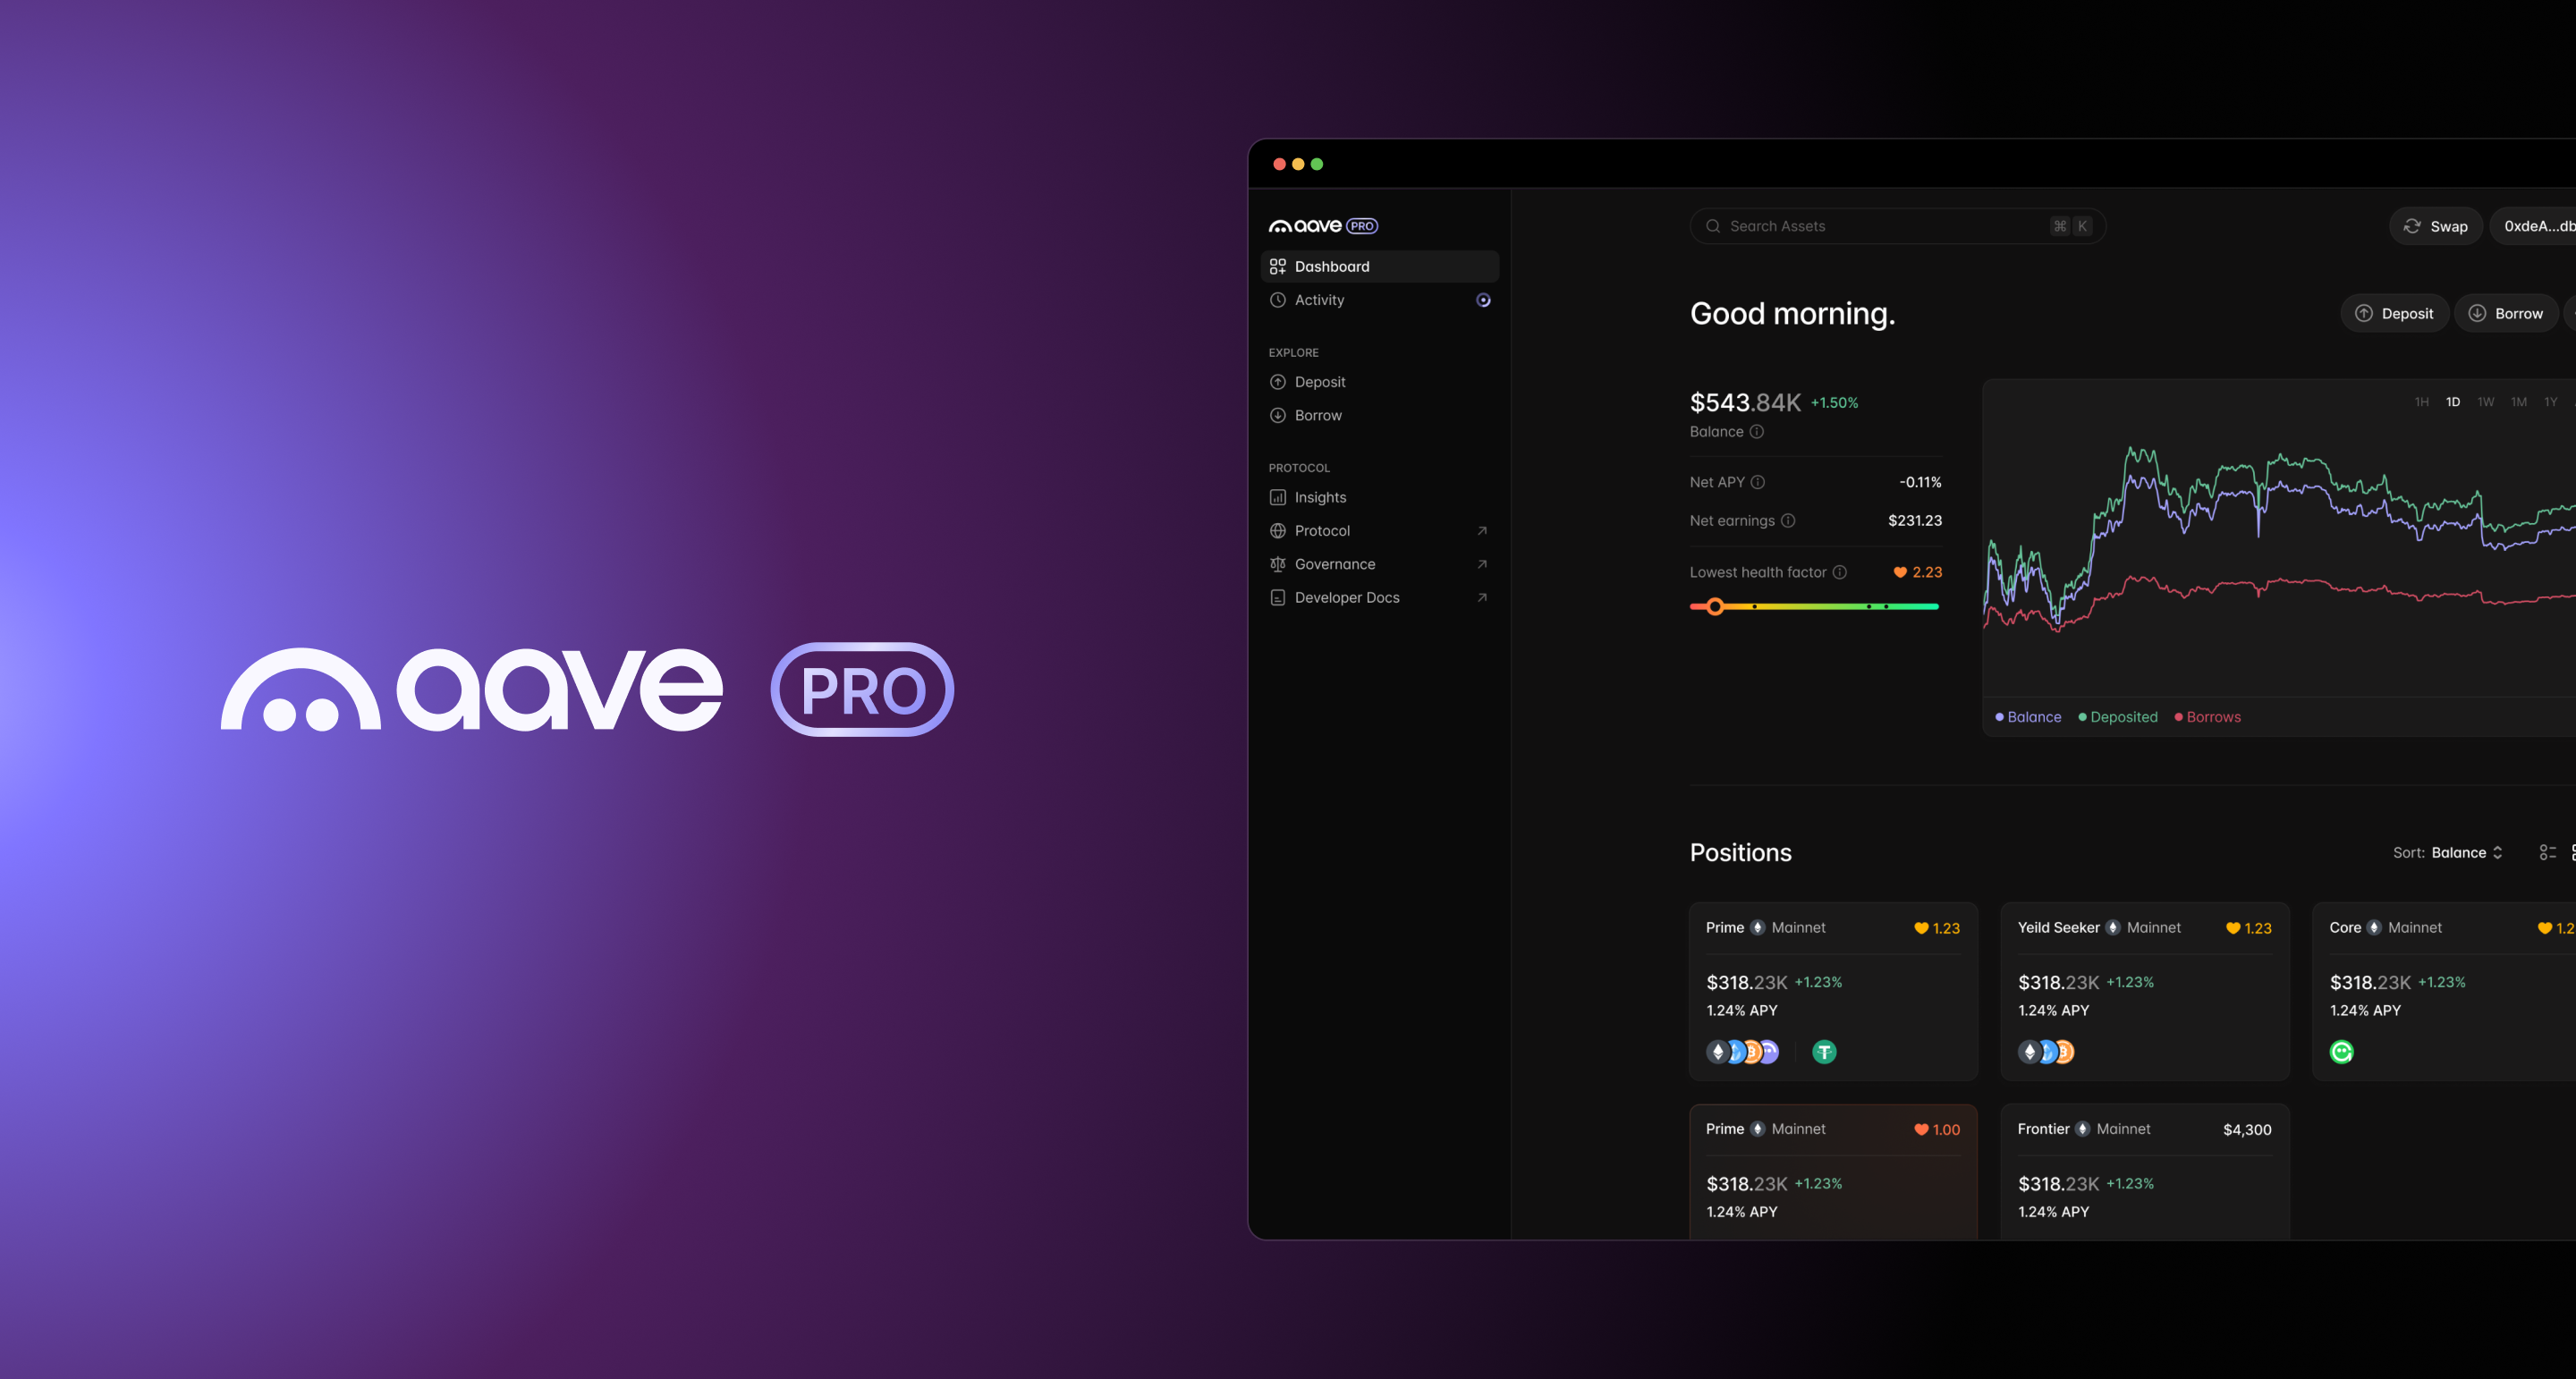
The left side of the screen contains the main navigation. The top section, labeled EXPLORE, holds the Deposit and Borrow pages. The section below, labeled PROTOCOL, links to Insights, Protocol, Governance, and Developer Docs. The Dashboard and Activity links at the top of the sidebar require a connected wallet.
The top bar shows your current network. Click the network name to switch between available networks (only Ethereum is available at launch). The Search Assets field in the top bar lets you find any asset by name or ticker. The Swap button allows you to exchange tokens. The Get Started button in the top right opens the wallet connection flow.
Deposit Page
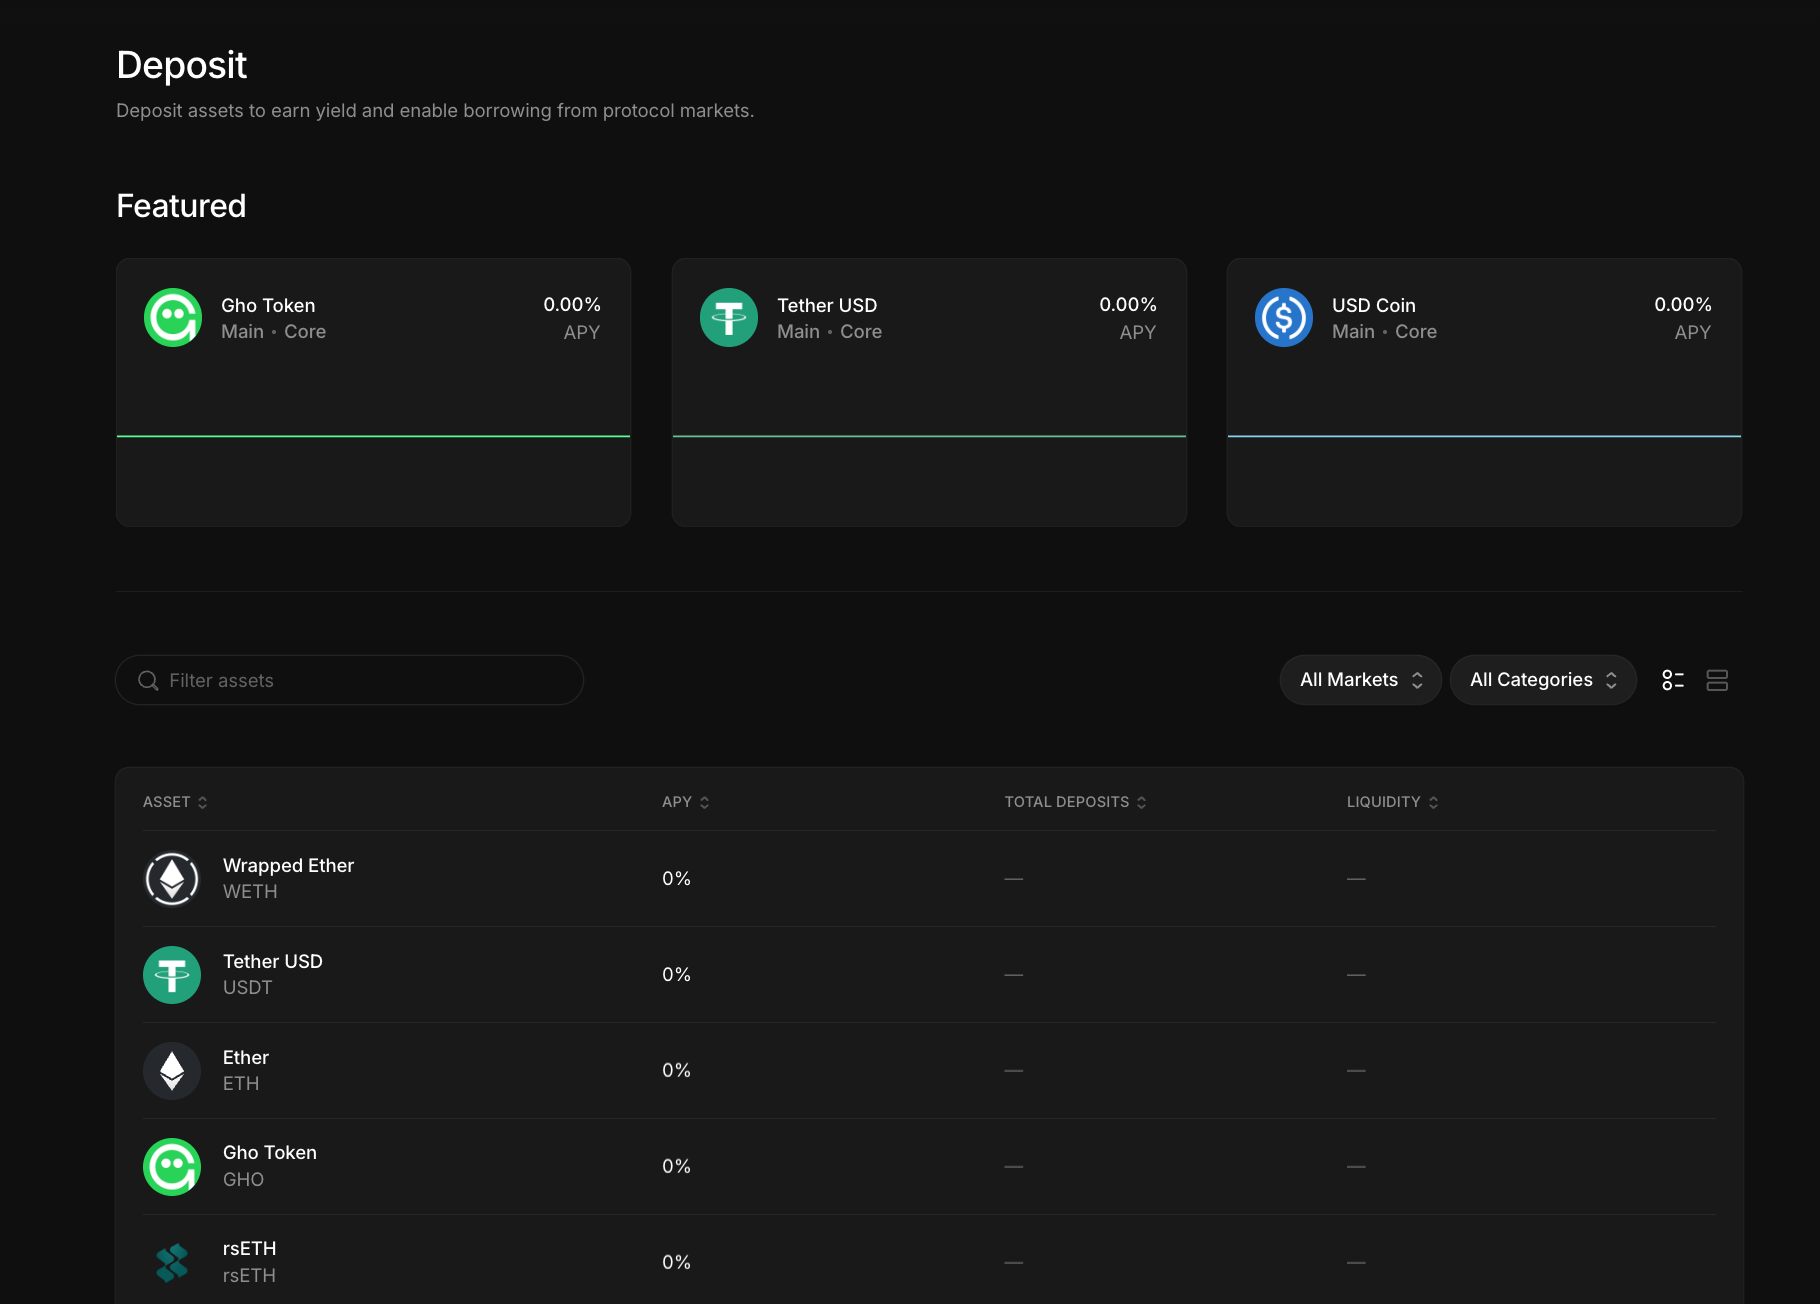
The Deposit page lists every asset available for supplying to the protocol markets. A Featured carousel at the top shows featured markets with their current APY and a small chart of recent rate history. Below the carousel, a full list shows all assets.
The list shows the ASSET name and ticker symbol, the APY you earn by depositing, the TOTAL DEPOSITS across all markets, and the LIQUIDITY currently available for borrowers to draw.
Above the list, a Filter assets search box and two dropdown menus let you narrow the list. The All Markets filter narrows the list to a specific Hub, such as Core, Plus, or Prime. The All Categories filter narrows by asset type.
Asset Detail Page
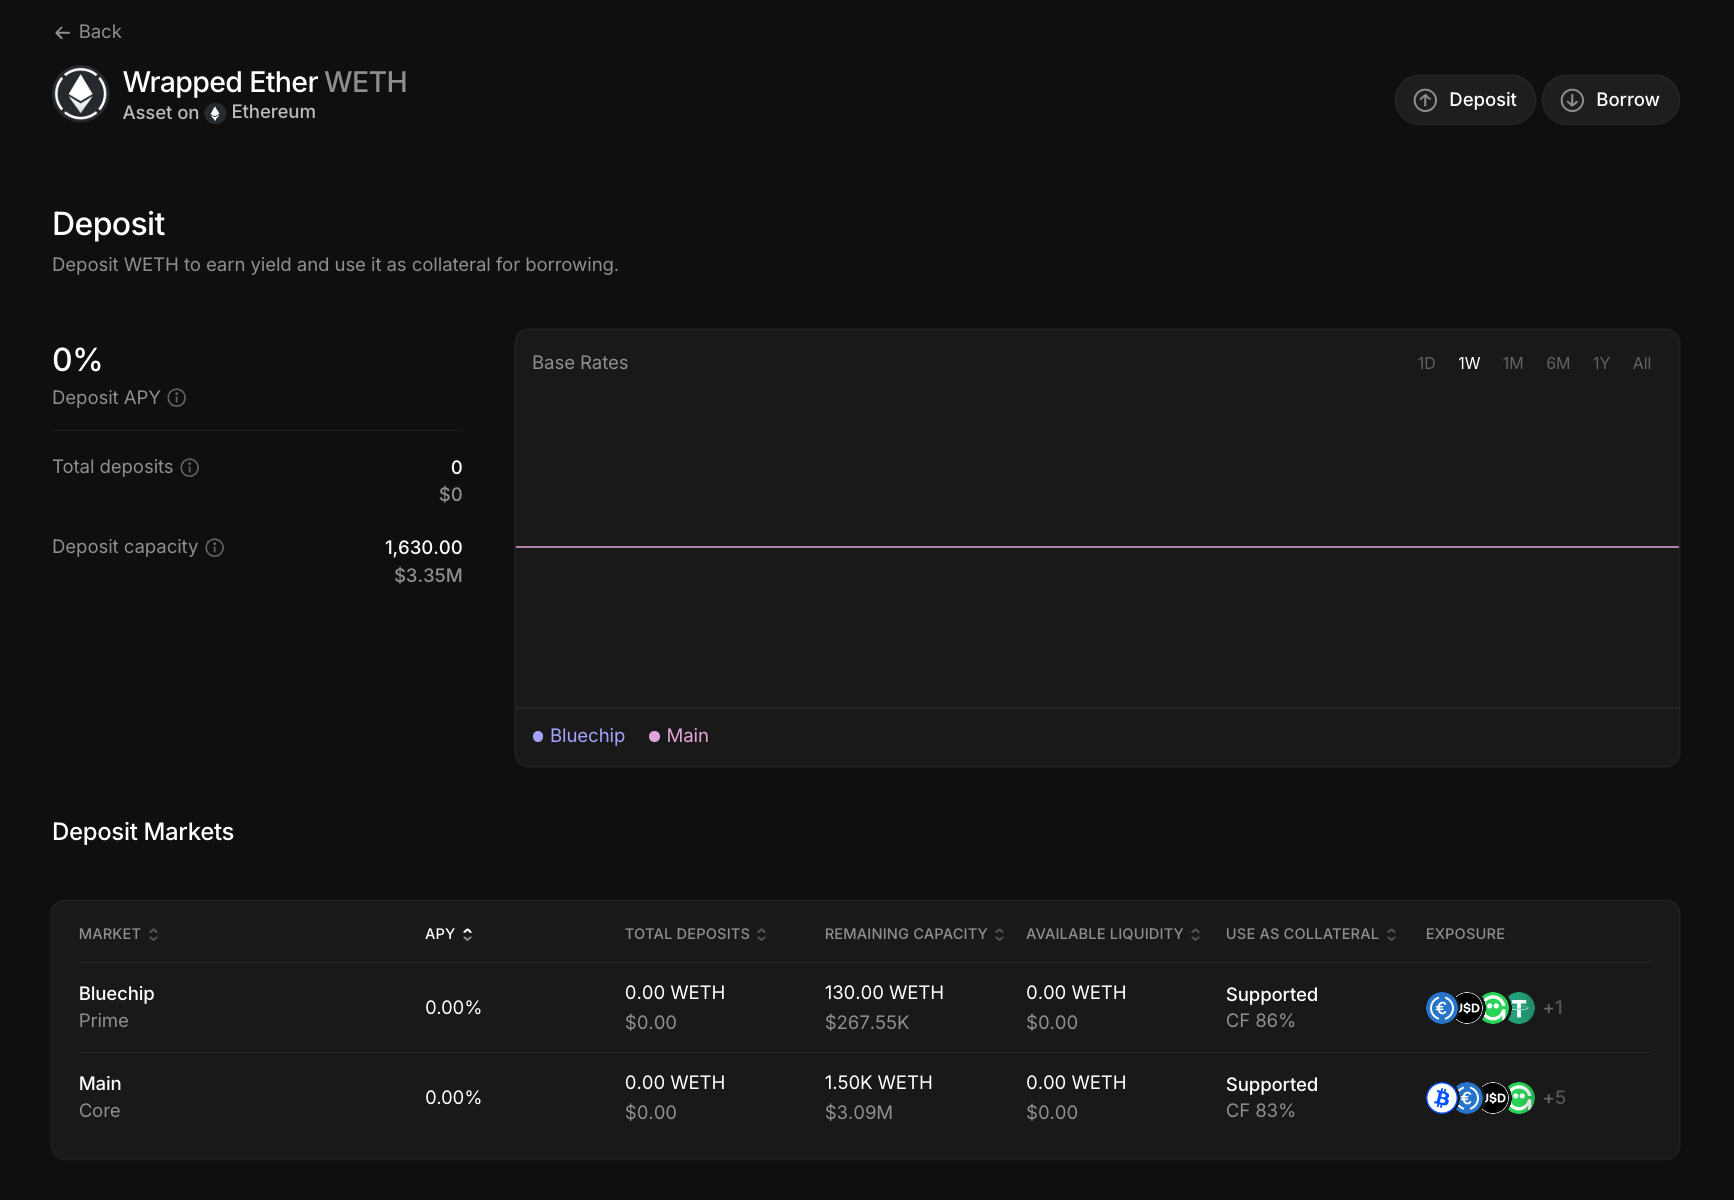
Clicking any asset opens its detail page where the top of the page shows the asset's total deposits across all markets, total borrows, and current price.
Below that, the Deposit section shows the overall deposit APY, total deposits, and deposit capacity. Deposit capacity is the maximum amount the protocol will accept for that asset. A Base Rates chart shows how the deposit rate has moved over time. You can toggle the chart between different markets using the legend buttons below it.
The Deposit Markets section shows every market where you can supply this asset. It displays the MARKET name, which includes the Spoke and Hub. It shows the APY for that specific market and the TOTAL DEPOSITS already there. It also shows the REMAINING CAPACITY, which is how much more can be deposited before the cap is reached, and the AVAILABLE LIQUIDITY, which is how much can be borrowed right now. Finally, it indicates whether your deposit in this market is Supported under USE AS COLLATERAL to back a loan, and lists the specific collateral types accepted in that market under the EXPOSURE column.
The Collateral Factor, shown as CF followed by a percentage under USE AS COLLATERAL, tells you how much borrowing power your deposit gives you. A CF of 80% means that for every $100 you deposit, you can borrow up to $80 worth of other assets.
The Borrow section below works similarly. It shows the Borrow APY, Total borrows, and Borrow capacity. A Base APY chart shows the borrow rate history. The Borrow Markets section lists every market from which you can take a loan against this asset. It shows the MARKET name, APY, TOTAL BORROWED, AVAILABLE LIQUIDITY, and the specific collateral types each market accepts under SUPPLY COLLATERAL.
How to Deposit
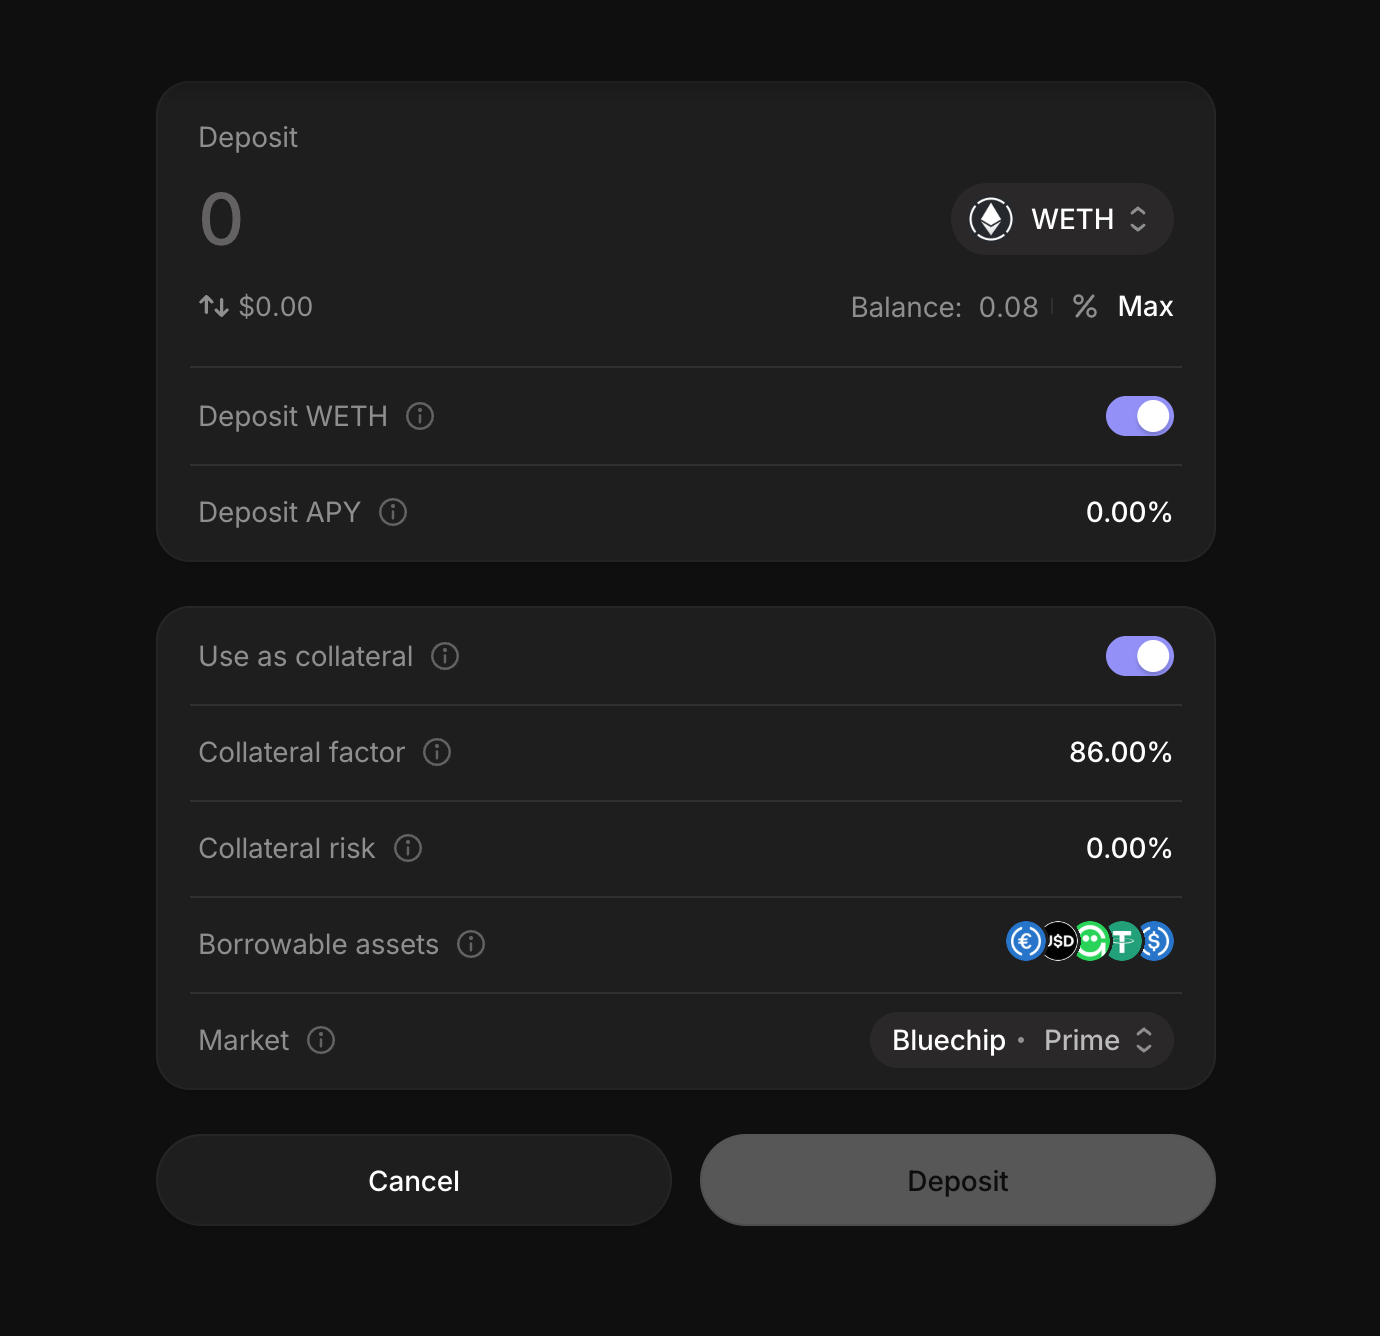
Navigate to the Deposit page or the asset detail page for the token you want to supply. Click the Deposit button. A transaction panel will appear. Enter the amount you want to deposit, review the details, and confirm the transaction in your wallet. Once the transaction is confirmed on-chain, your deposit will appear in your Dashboard.
How to Borrow
You must have an active deposit before you can borrow and your deposited assets serve as collateral. Navigate to the Borrow page or the asset detail page for the token you want to borrow. Click the Borrow button. Enter the amount, review the market's interest rate and the collateral it requires, and confirm the transaction. Your loan will appear in your Dashboard along with your updated health factor.
Dashboard
The Dashboard shows your current positions. It displays your total deposited value, your total borrowed value, and your health factor. The health factor is a number that tells you how safely your loans are collateralized. A health factor above one means your collateral covers your debt. As the value of your collateral falls or the value of your debt rises, your health factor decreases. If it reaches one, your position becomes eligible for liquidation.
Check your Dashboard regularly, especially when the market is volatile.
Swap Feature
The Swap button in the top bar allows you to exchange one token for another directly within the interface. This is useful if you want to convert an asset into one that earns a higher yield or qualifies as collateral in a specific market.
Aave Pro Updates
This is a living guide that will be updated alongside Aave Pro. As a product, it will continue to evolve and new features will be added over time to make Aave V4 as easy as possible to use.
You can always check back here for the latest updates on new features and how they work. Or if you need a reminder on what's going on in the UI.
If you have any questions or feedback, please join the Discord.